Firmware v0.5.3 is now officially released! A matching version of odrivetool is also published.
Updating odrivetool
To update odrivetool, simply use pip install --upgrade odrive.
Updating ODrive firmware
Updating ODrive firmware can be done by using odrivetool dfu. The current recommended process for flashing is as follows:
Linux
Power off the ODrive
Set the DFU / RUN switch to DFU
Power on the ODrive
In a shell, type odrivetool dfu. Flashing should succeed.
Power off the ODrive
Set the DFU / RUN switch to RUN
Power on the ODrive
Verify functionality by launching odrivetool
Windows
odrivetool dfu is not supported on windows. To update:
You can use the DfuSe app from ST.
Download the tool here. Unfortunately they make you create a login to download. Sorry about that.
After installing the tool, launch DfuFileMgr.exe which probably got added to the start menu as “Dfu file manager”.
Select “I want to GENERATE a DFU file from S19, HEX or BIN files”, press OK.
Click the button that says “S19 or Hex…”, find the ODriveFirmware.hex file you built or downloaded.
Leave all the other settings as default and click the “Generate…” button.
Save the output file as ODriveFirmware.dfu. Note that the success message has a warning sign for some reason…
Launch DfuSeDemo.exe which probably got added to the start menu as “DfuSeDemo”.
Force the ODrive into DFU mode, as per the instructions above “How to force DFU mode”.
In the top left it should now be connected to “STM Device in DFU Mode”.
If it doesn’t appear, it may be because the driver is set to libusb by Zadig. We need to set it back to the original driver. Follow these instructions.
If, after doing the above step, the ODrive still installs itself as a libusb device in Device Manager, you can try to delete the libusb driver (this is OK, since we can use Zadig to install it again). You can simply delete the file C:\Windows\System32\drivers\libusb0.sys.
In the bottom right section called “Upgrade or Verify Action” click the button “Choose…”.
Locate the ODriveFirmware.dfu we made before.
Click button “Upgrade”.
If you get a warning that it’s not possible to check that it’s the correct device type: click yes to continue.
Congratulations your ODrive should now be flashed; you can now quit DfuSeDemo.
Turn off the power to the ODrive and set the DIP switch back to RUN mode.
I might have stumbled upon a couple of bugs.
-POTENTIAL BUG 1:
The first one is related to startup_encoder_index_search. With the previous firmware version, I was able to start the index search at startup on both axis. Now, it simply does not work. All variables seem to be correctly set, but at startup nothing happens. Furthermore, if I try to put one of the axes in AXIS_STATE_CLOSED_LOOP_CONTROL right after bootup (no new calibration), I hear the current running through the phases, but the motor does not hold its position (maybe it is due to the failed index search).
dump_errors(odrv0) doesn’t show any errors.
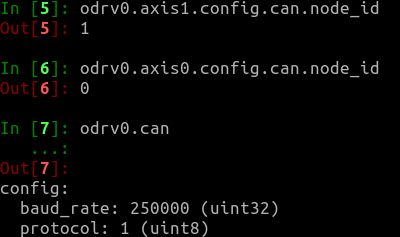
I’ll report here the steps I used for axis0 configuration(axis1 is the same):
It might be related to this change.
I was testing the CAN communication between my ODrive and my RPI 4B.
The RPI 4B mounts a CAN-SPI hat from Seedstudio (see 2 Channel CAN BUS FD Shield for Raspberry Pi - Seeed Wiki), which has two MCP2518FD chips.
I already tested successfully this shield with ODrive using the previous firmware and Buster OS on the RPI. For setting up the hat I simply used the installation script available at seeed-linux-dtoverlays/modules/CAN-HAT at master · Seeed-Studio/seeed-linux-dtoverlays · GitHub and I was able to receive correctly the Heartbeat and also use the can_dbc_example.py.
Now, due to practical reasons, I have installed Ubuntu 20.04 Server on my RPI. Following the Wiki at 2 Channel CAN BUS FD Shield for Raspberry Pi - Seeed Wiki, I added " dtoverlay=seeed-can-fd-hat-v2" in my /boot/firmware/usercfg.txt file and rebooted.
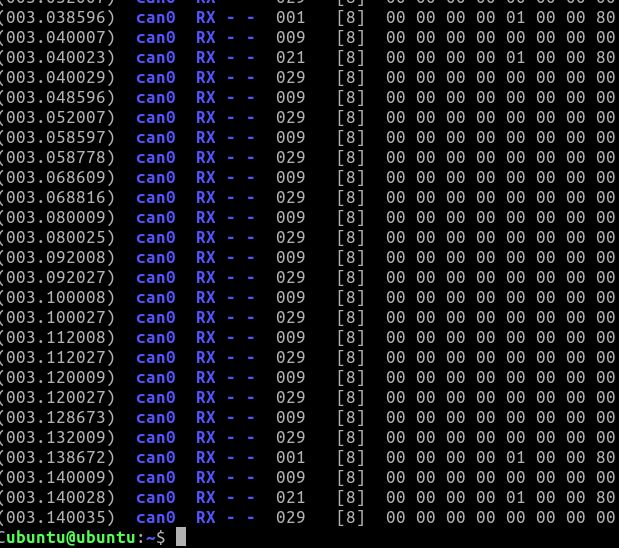
After this, it appears that the two CAN interfaces are successfully initialized
.
After this, I set the can0 interface with “sudo ip link set can0 up type can bitrate 250000”, power up the ODrive and connect it to the CAN bus (after having set the correct bitrate) and I run “candump can0 -xct z” to check the Heartbeat message.
I have the following strange result:
Small update. Apparently the only reason why can_dbc_example.py wasn’t working is that create_can_dbc.py and, as a consequence, odrive-cansimple.dbc were not update to take into account the different Heartbeat message structure. Modifying the database with protocol message specs available at can-protocol.md solves the “issue”.
However, I still do not understand why I am getting all those additional messages, since the Heartbeat should run, as far as I am aware, at 10Hz.
Yes, sorry, the .dbc file wasn’t updated. I will fix that on the repo.
0x001 is the axis 0 heartbeat (10Hz by default)
0x021 is the axis 1 heartbeat (10Hz by default)
0x009 is the axis 0 encoder positions (100hz by default)
0x029 is the axis 1 encoder position (100Hz by default)
Actually, I was doing some tests this morning to isolate better the problem.
What happens is that normal calibration seems to work just fine on both axes.
When I run encoder index search, the following happens:
Axis0 starts to rotate and then seems to sort of slip at a certain point. However, if I run dump_errors(odrv0) no error is reported.
Axis1 does not move at all (not even noise from the phases).
Normal calibration and closed loop control seems to work fine.
Hi
I just recieved a new odrive 3.6 with V0.5.3, Python 3.8 Spyder
I am trying to setup a motor without sensors.
The odrive.enums does not contain the .enable_sensorless_mode that is needed and I can not find any working way to put the odrive into sensorless mode.
I am clearly missing something basic or the mode has dissapered with the newest update. Can you point me in the right direction?