UI for Odrivetool

Hello,

I am planning to build a pick and place machine so I bought Odrive board and after tinkering for a while with the odrivetool I found it very tedious to navigate through a bunch of settings in order to see or change configurations as you really need to learn where things are located. So I thought to make a UI tool for it to be able to see all configurations in one place.

So, I made this basic UI tool using pyqt5 and pyqtgraph. It’s work in progress but I am at the point where I get many ideas but not sure which ones to implement so I thought I will ask a community in which direction I should go.

Here are some screenshots.

Buttons at the top are pretty much self explanatory. Scan configuration is to read all configurations from the board but it’s programmed to do it all automatically at successful connection. Write configuration is for sending configuration if anything is changed.

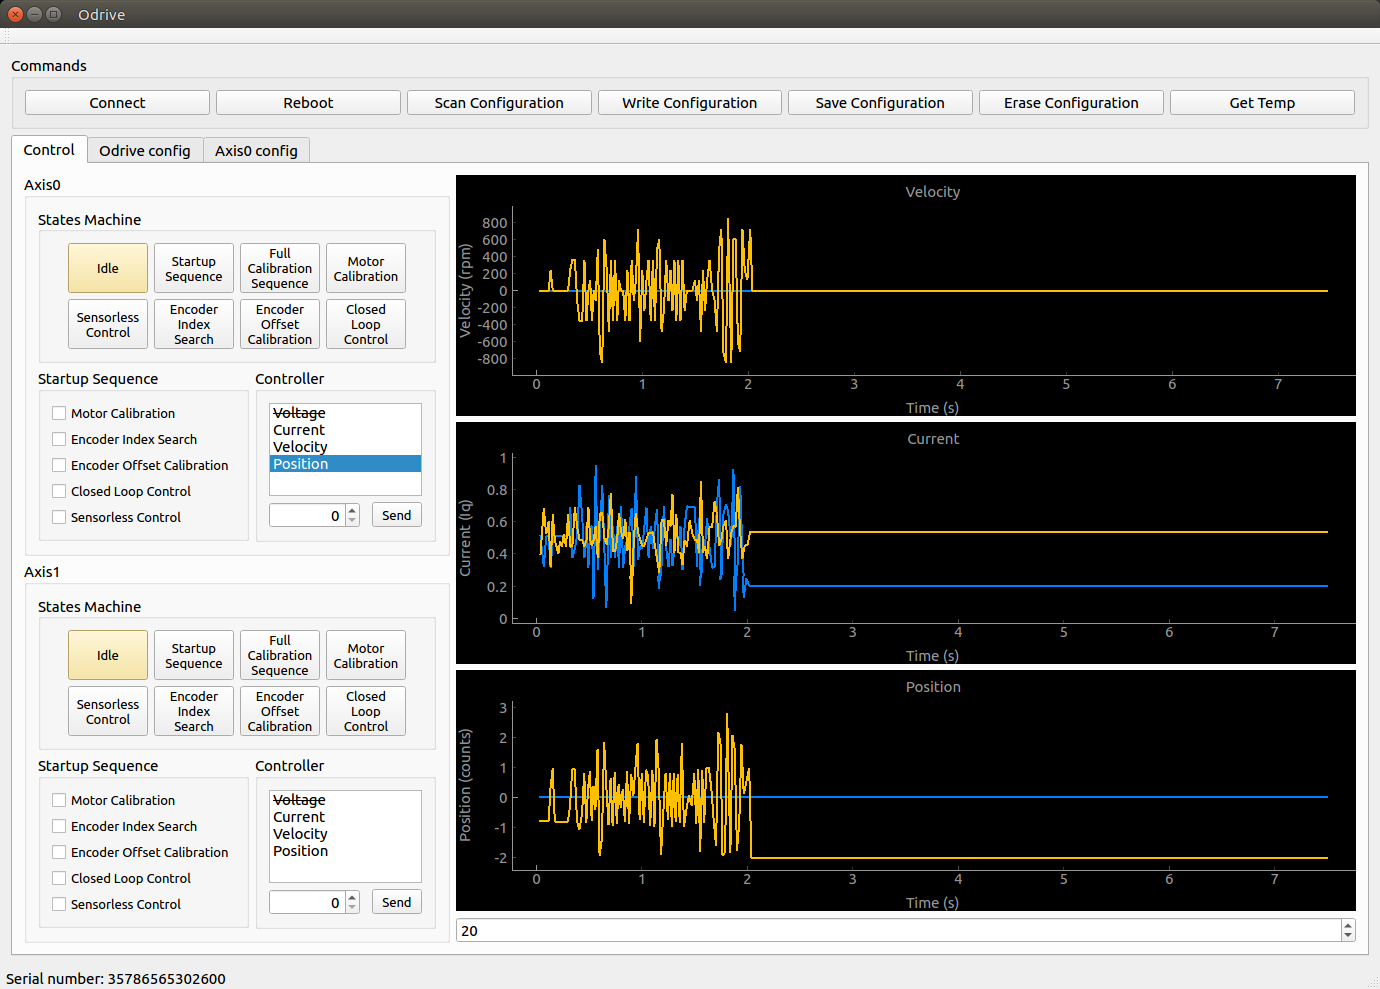
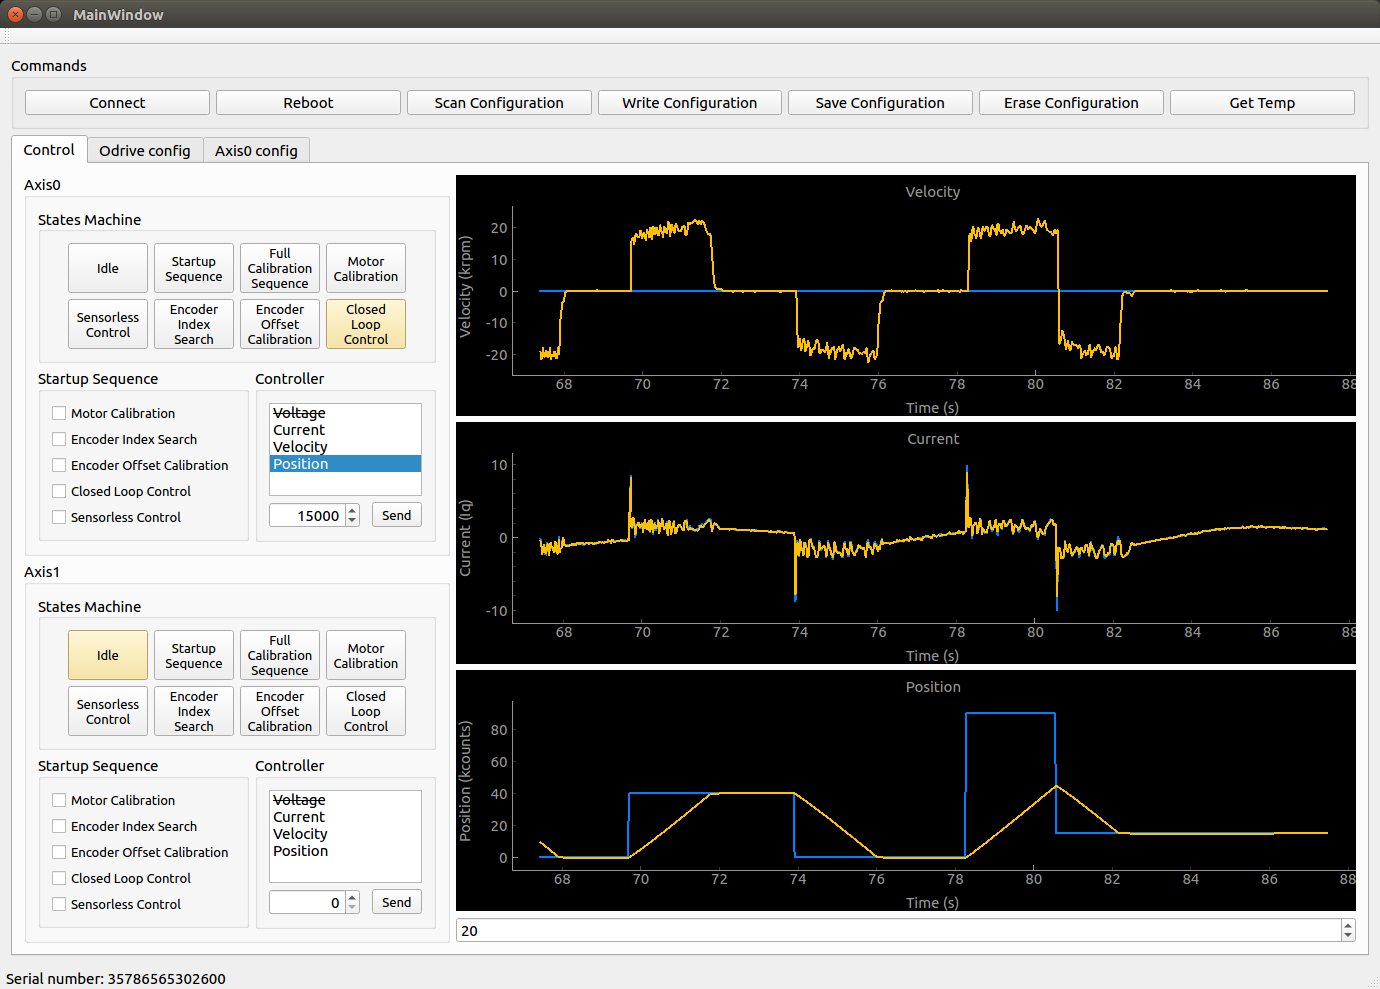
In Controls Tab you can select the Machine state and see which one is currently active. There are three graphs of velocity, current and position. Blue line indicates the set point and orange is for the current point.
If closed loop control state is selected you can choose control mode from the list and send commands.

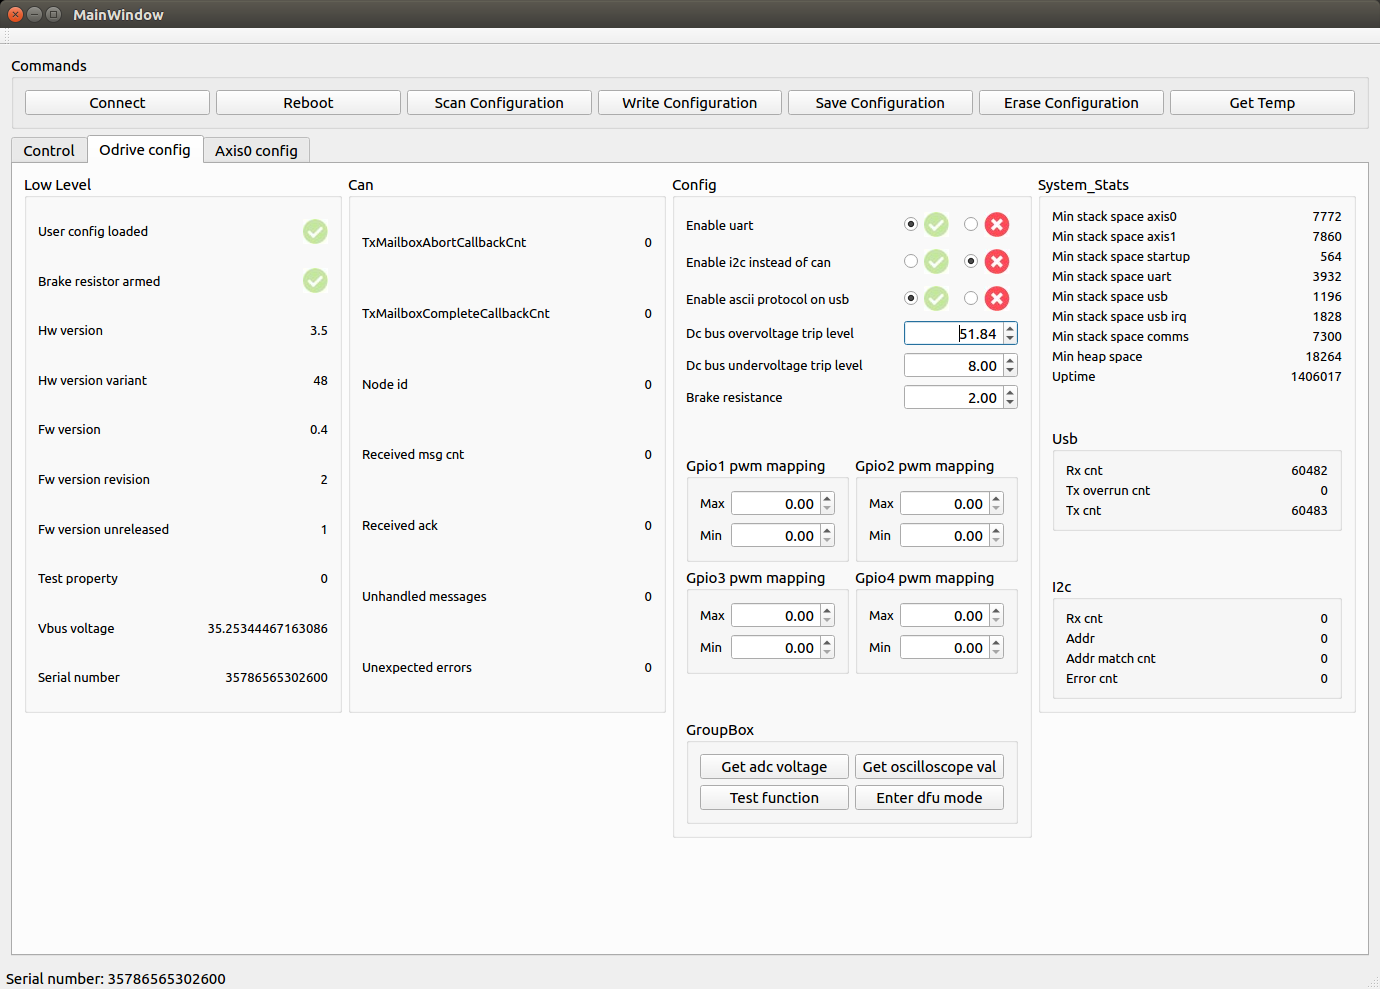
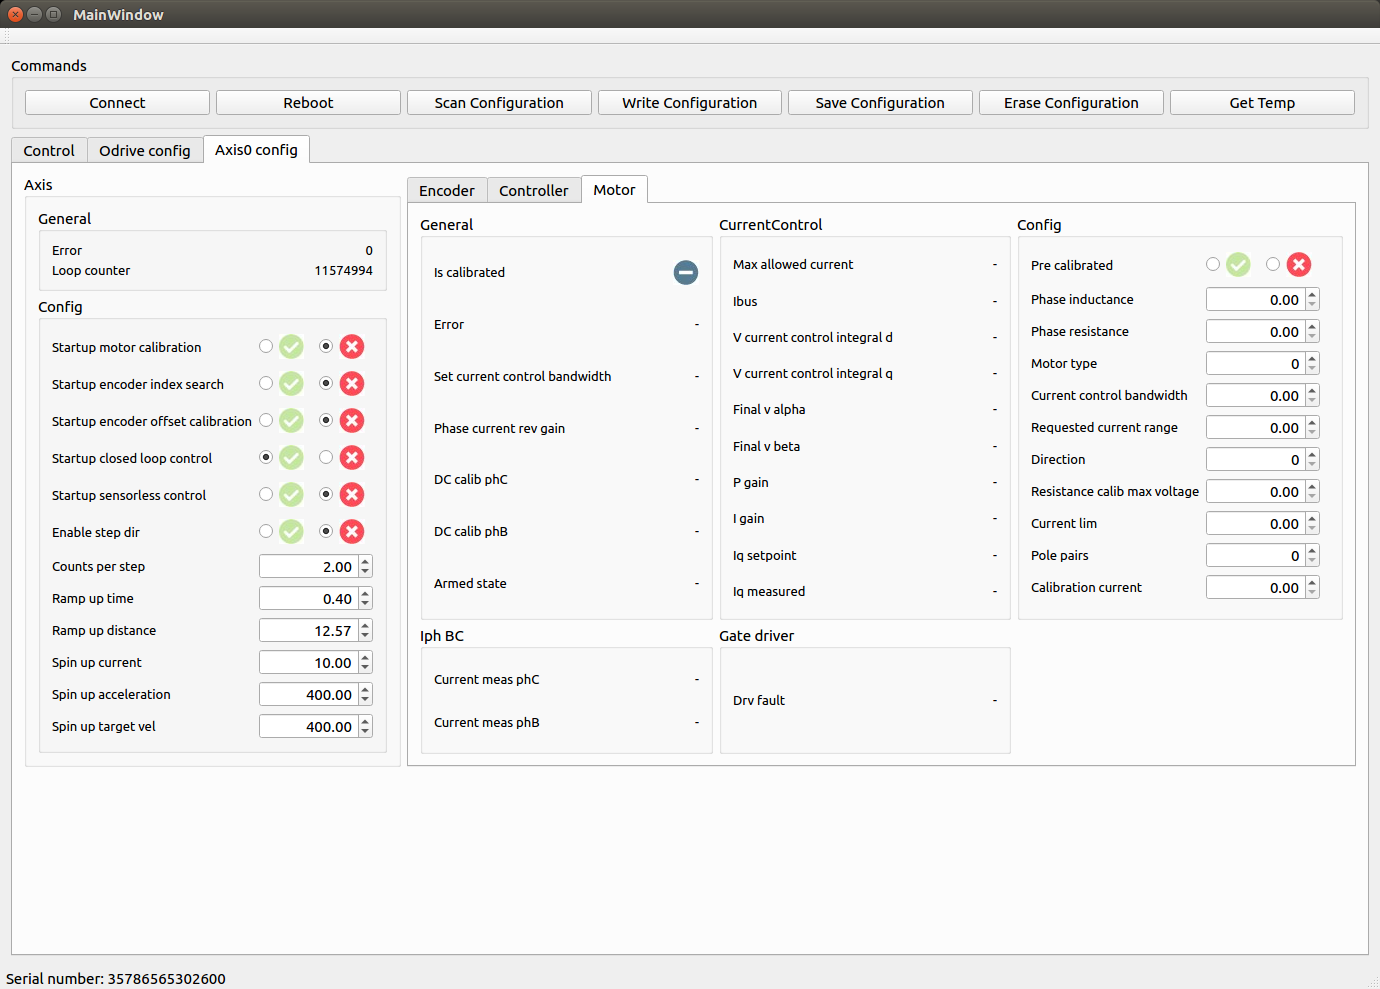
Configuration window was created a while ago, I believe some settings changed with the new update. I need to update things too. But it just reads all settings that odrivetool offers.


And here is a short video to show UI tool in action.

Only axis0 is functional as I am deciding what would be a good way of displaying it all. And how should I write the code so I don’t have to repeat all the settings for both.

Also, I was thinking of adding Jog functions like in OpenPnP just to move axis instead of sending numerical commands.

In general, I would like to know if anybody would be interested in using such a tool.
I have no problem of sharing the code, I am just not sure if I need to choose some sort of license before posting and I would need to do some code clean ups so it’s human readable.

So please, if anybody has any comments, it would be very helpful.

Thanks

26 Likes

That’s amazing. I want to start using it now.

Your UI looks excellent, I am very impressed.
I’d be happy to try it and maybe I can help to improve with hints and feedback.

Really cool! Any idea how fast you are refreshing the position, current and velocity values?

This is amazing! I am currently working on a robotic arm as my thesis and I need to link a computer simulation to my odrives. I could build upon this tool to not only turn it into a linker, but to also have a UI to make debugging easier.

I would be very happy if I could try this tool. I will give feedback and hints about the UI and if you don’t mind, I would like to build on this tool for my thesis, while of course giving full credits to you!

Absolutely would use. I should be getting my first Odrive today in the mail today to use with hoverboard motors for robotics. This interface just makes since for the ODrive. Please consider creating a license and lets start beta testing it! Absolutely amazing job.

Great! Thanks for the good words.

@Riewert The way code is written now is that after successfully finding odrive two periodical timers are being created. One timer with 20ms period to update all graphs and another timer with 500ms period to update machine states. I think that the period the graphs are being updated could be selected in the UI. Since this is written in python I am just calling find_any() and using retrieved ‘Remote Object’ to read values from it. If I understand correctly on how this Remote Object works it creates two way communication to retrieve values, it probably would be more efficient if we could configure callbacks and just retrieve those, but that’s something to consider for future that affects the firmware too. To come back to your question, 20ms seemed good enough but I am sure USB could handle faster rates, I am just away for this weekend and can’t test 2ms rates etc.

@LowiekVDS I started making this tool just as UI for odrivetool, I suppose the purpose was just to help to calibrate/configure odrive board. But I definitely have ideas to add extra tabs for Motion Control as I am also building systems using tinkerforge items and would like to have it in a combination with odrive. I would like to see how this Trajectory control will roll out to see if that’s something we could use. Or other additions like Gcode interpreter etc.

But priority still would be to finish this tool, as I don’t have axis1 implemented yet and what if we want to connect multiple odrive boards. Including Axis1 would be the first thing to finish. Another idea I had is to visually show that configurations adjusted in the app are different from what’s loaded in the odrive board and it kinda highlights them together with the “write configuration” button.
For Axis1 I am not sure if it would be better to have all curves plotted in the same graph or separate graphs for axes. Or even inside the axis tab it has 3 tabs for encoder, controller and motor, it saves space if you have a small screen but maybe seeing all in one place would be better. So, yes, I am hoping with the feedback we could make this better.

I will prepare setup instructions and do some spaghetti code clean up. As I mentioned I am away this weekend and want to do couple small fixes but I would like to test them before publishing. As for licenses being honest this my first contribution to such projects. I know that odrive and pyqtgraph is using MIT license but PyQt5 is GPL v3. I am aware that PyQt4 has freer license than PyQt5 but since this is a non commercial maybe it doesn’t matter that much. If someone could advice on it, that would be very useful.

Thanks again for the feedback, I am looking forward to implementing these things together.

Hello,

Link to the repo https://gitlab.com/p87942130/ui_odrivetool
so obviously need to make sure that odrivetool is running first before running the python script

Besides the comments I made previously about changes I would want to apply, it is still missing sensorless estimator configurations and Some settings are duplicated in multiple places.
Startup sequence checklist is only functional from Axis0 config. So I will remove it from the Control tab and replace with some simple motion commands.

The whole thing is tested only on Ubuntu 16.04 - Python 3.5.2

The whole code is just a draft and needs to be optimized and probably rewritten. I am planning to work on it weekly, not necessarily daily. If any requests or changes will be posted I will try to prioritize those.
Thanks!

2 Likes

I can’t thank you enough for providing this tool. I hope you continue to improve it but all ready looks amazing. Would like to see the trajectory control in there as well.

I was able to get this to work with Windows 64bit and python3.7
I had to make a change to step ####### 2. Activate python source for windows.
first needed to install
pip install virtualenv
then run
virtualenv /env/scripts/activate

3 Likes

Nice. Since I am not using windows and I know that python can be a bit tricky there, I am glad it works.
Looking forward for the feedback.
I am planning to spend at least few evenings per week on it until it becomes something more decent.
I will try to document changes but you can pull from a repo whenever there are new commits.

Since I see a lot of people often experience various troubles with odrive, I think I will prioritize to add a way to show whenever errors occur to ease debugging.

This is really cool! I did a big search/replace to change axis0 to axis1, and had to remove some plots because I removed some protocol properties in order to save stack space, but now it works great!

I am glad it’s not too difficult to make changes as I know that not all UI elements are properly named.

I did few changes to make controls a bit more convenient.
Removed unused statup_sequence group and changed controller mode layout. I think changes are pretty much summed up in this video.

I changed a bunch of things so it will be easier to add axis1 and I am kinda half way through of adding it.

1 Like

Cool, happy to test out that revamped UI with axis1 when it’s ready!

Axis1 is ready! Hopefully no naming errors lol. I Connected my motor to axis1 and tested, it seems fine.

I will be working on adding a better way to display errors.

In general I was thinking of adding some sort of “first time setup” wizard. For example, that forces you configure some settings before using. For example, you need to select if you are using encoder or not, if yes, then you must enter PPR of the encoder etc… I think having such wizard would help to void many first time problems. Any ideas or requests are welcome! Thanks!

4 Likes

Nice work!

It would be nice, if the tool periodically polled the Odrive for error and configuration. Also having a human-readable error message would make the tool much more usable.

1 Like

Thanks!

So, polling errors and making them human readable is the next thing I will focus on. But not sure about configuration as it would keep overwriting the fields you are trying to change, unless you meant non configurable variables, then yes adding polling of non configurable stats are doable.

For the errors I was thinking to display text inside Status bar at the bottom or maybe just have a separate tab for it. Pop-ups would be annoying I believe. Still have to come up with a nice way.

Status bar would be perfect in my opinion for reporting the errors (ideally with a red background to see the error clearly).

About the config - would it be possible to show a text next to the edit field with the current value? In the current version, it is unclear what are the values in oDrive and what has been only edited locally.

Another idea for the future: Guide for auto-tuning the PI/PID loop.

1 Like

Nice work! I tried doing the same but got frustrated with QT and decided to make a javascript & websockets interface instead. It’s not quite done, but I really like how I can easily add new features using HTML5 & CSS3 :slight_smile:

@AdamMunich well, my specially is electronics and embedded system, I am no developer. But python is just so easy to debug and write code. So, I just like using it for all sort of scripting. It’s easy to setup multi-threading in QT etc. You should share your project! haha

So I added very basic polling for errors and for tests added it to display it in the status bar. But most likely I will change it. This was just a draft for testing. It kinda works, A - represents axis erros, E and M goes for Encoder and Motor. Still need to add sensorless. But the very basic works.

In this video I tried to create few errors by setting Idle state while calibration is on going. I have only Axis1 connected.

Very nice!
I think the main things I would try to improve is to make it more dynamic to changes in the ODrive property layout. For instance, make it work with N numer of axes in general, across M ODrives (with not necessarily 2 ax per OD).

Also, in say the config tab, you should be able to generate the presented elements from the object tree rather than hand-specified.
Of course in the main control window it’s appropriate to have hand-picked properties to monitor, since we happen to know that pos, vel, and current are the main interesting variables.

My ultimate vision is to present the ODrive object tree in an actual tree view, and then you can make your own dashboard by selecting or dragging out a parameter onto a canvas, and it can let you tile up sliders (or possibly plots).

Of course, don’t feel obligated to go this far, having a basic tool is really valuable still. Thanks for making it.

4 Likes