Robotic arm project

Hello ODrivers! I bought my first ODrive a while ago but didn’t get to do a lot until recently. I also never imagined such a vibrant community forum.

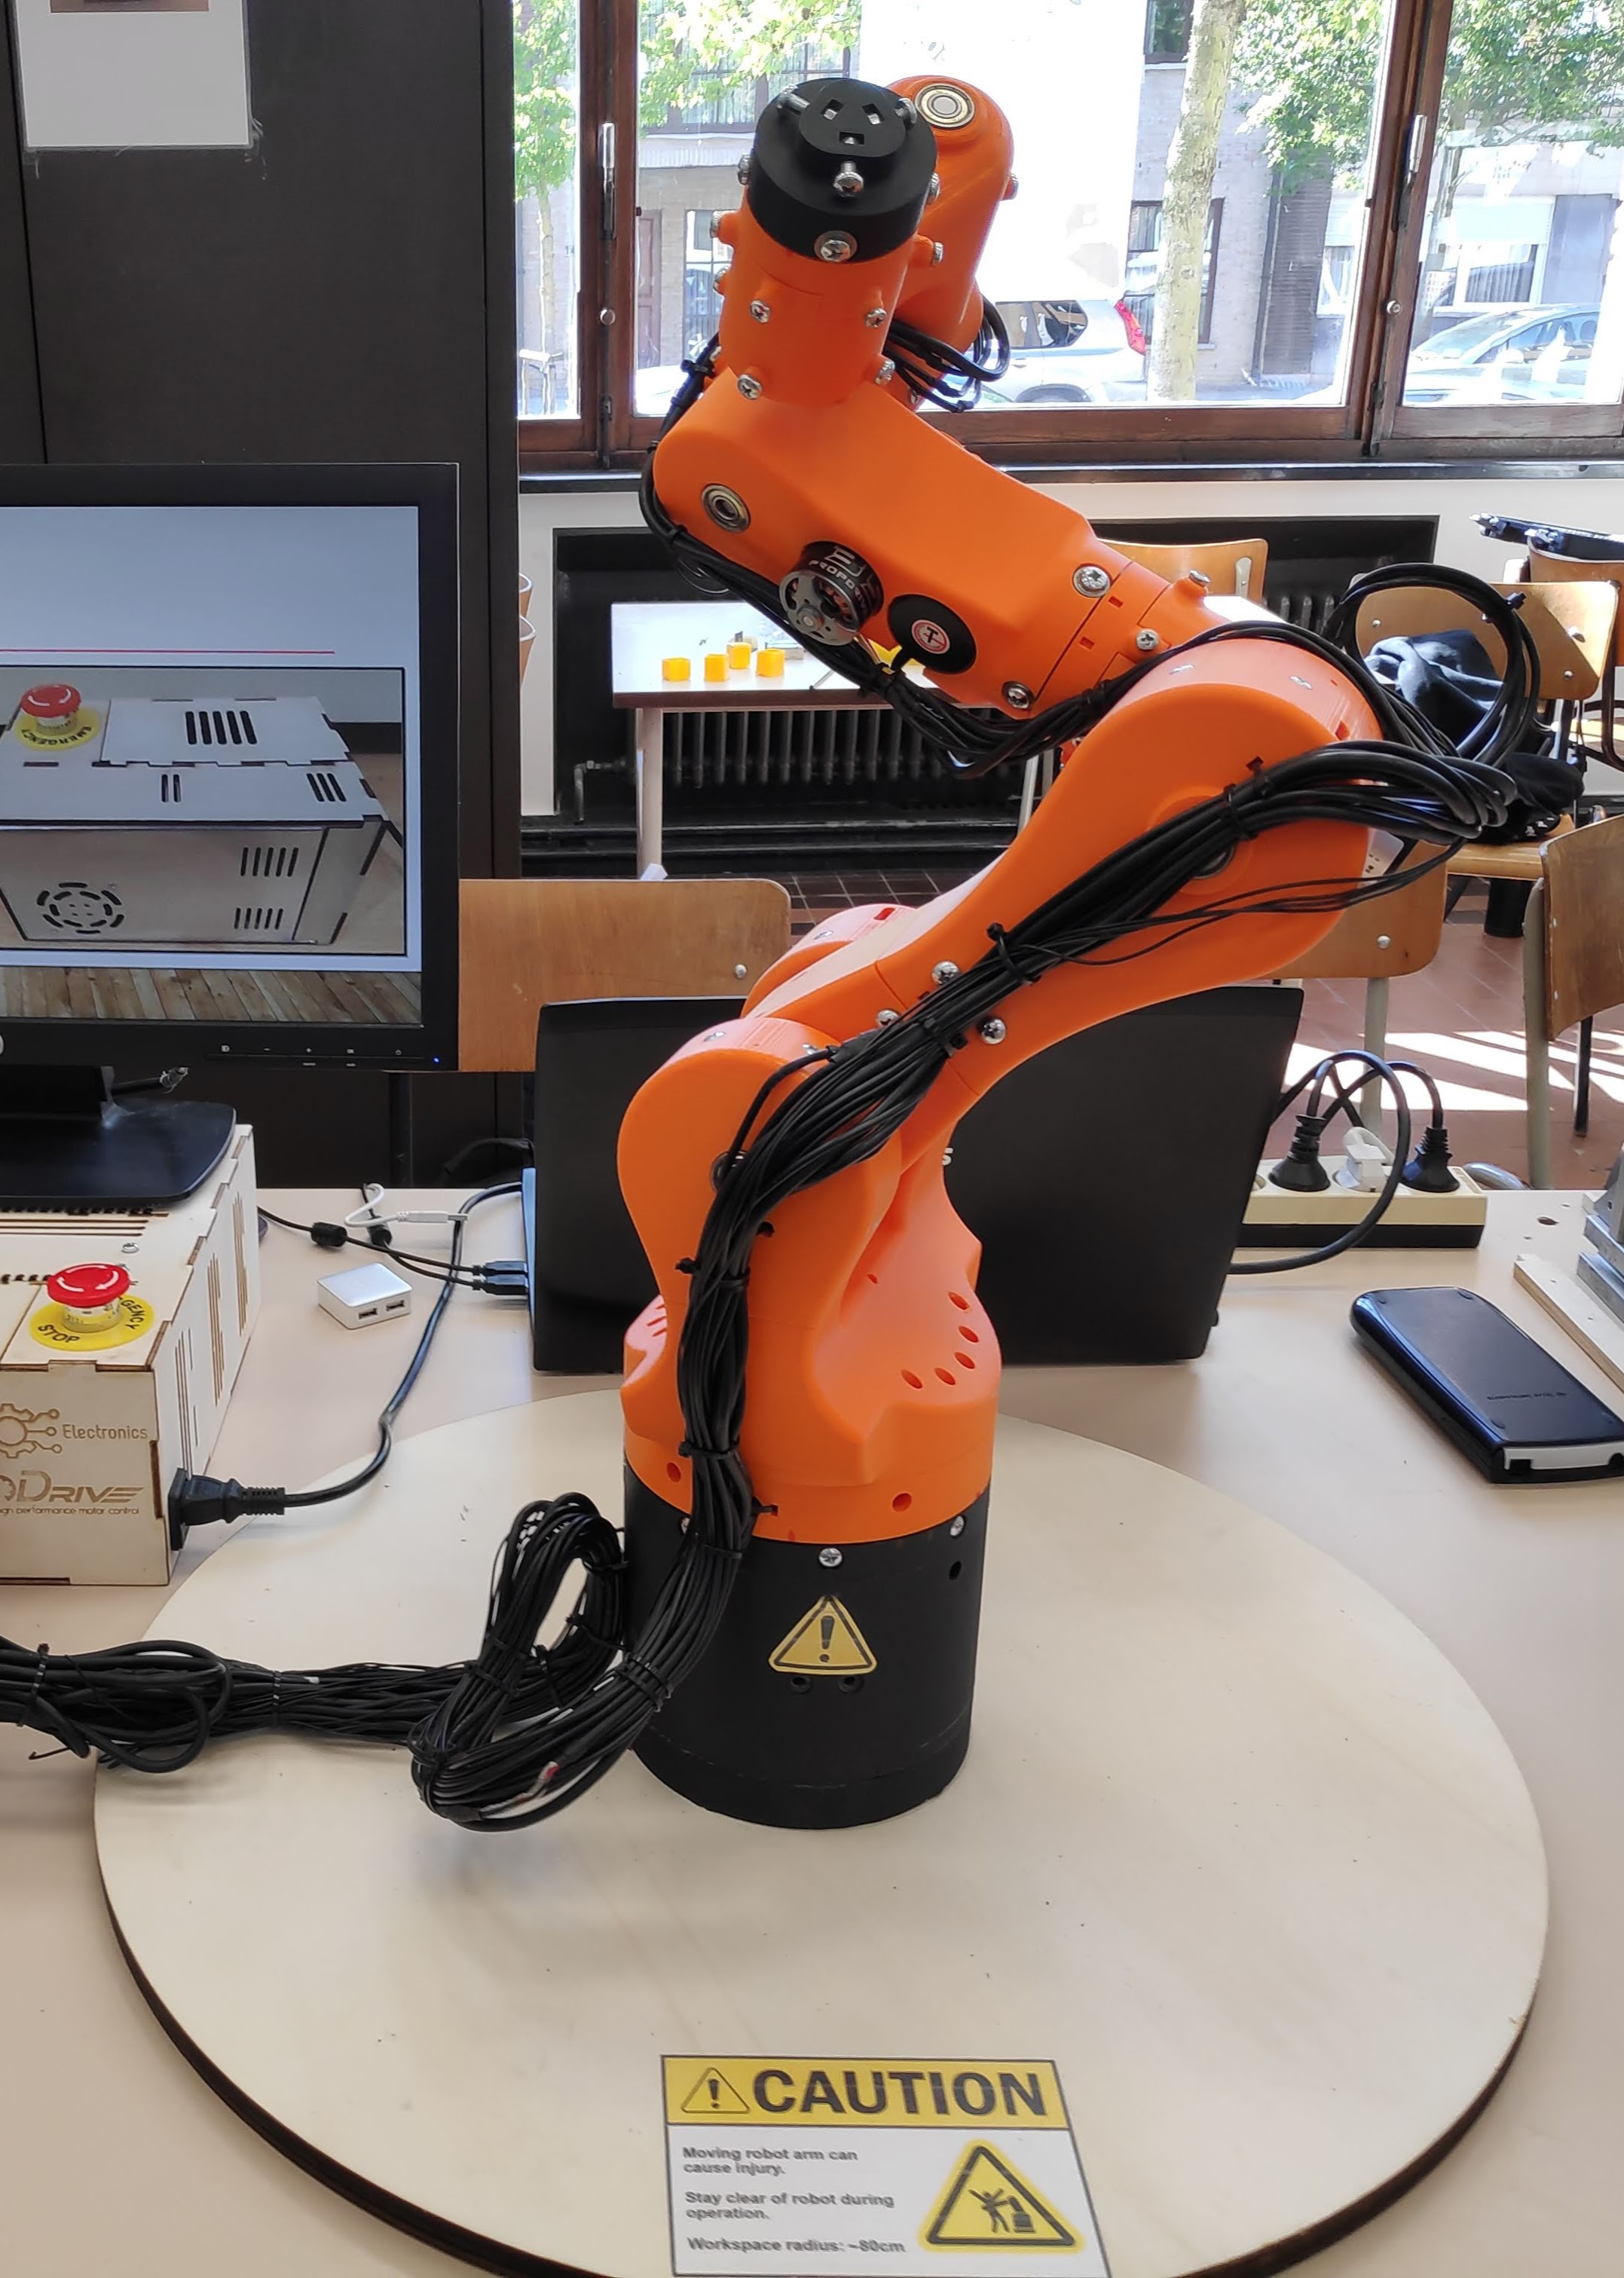
I want to share my 6dof robotic arm. Before ODrive I used hall sensors and cascade PID loop with FF. I couldn’t get FF terms right for desired performance. But no need for that anymore. ODrive just blows my mind. its awesome!

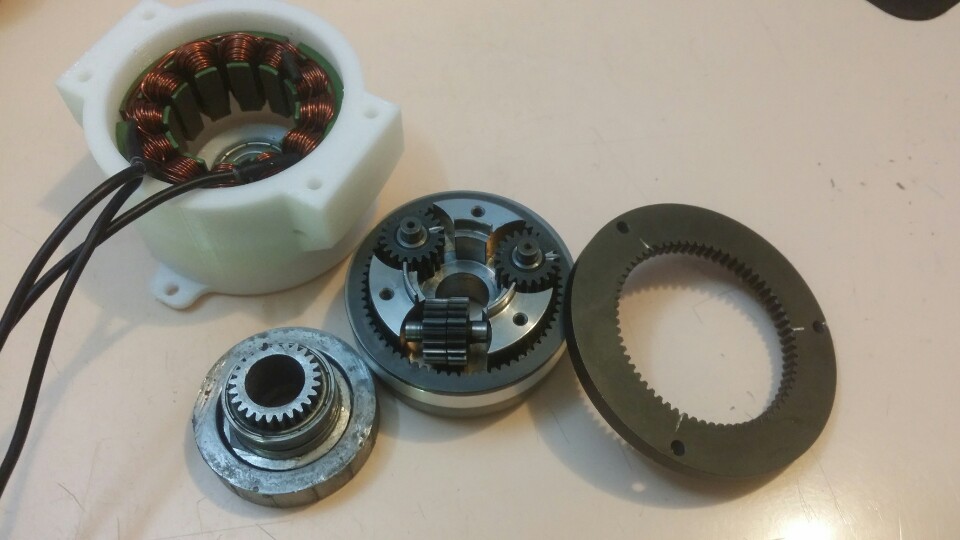
For joints it uses 5 harmonic drives and planetary gearbox. I paid 120$ each for harmonic drives from ebay seller regardless of the model (private messaging). All the motors weren’t dual shaft, so I drilled and tapped the other end then extended the shaft using a grub screw, superglue and a shorter tapped rod.

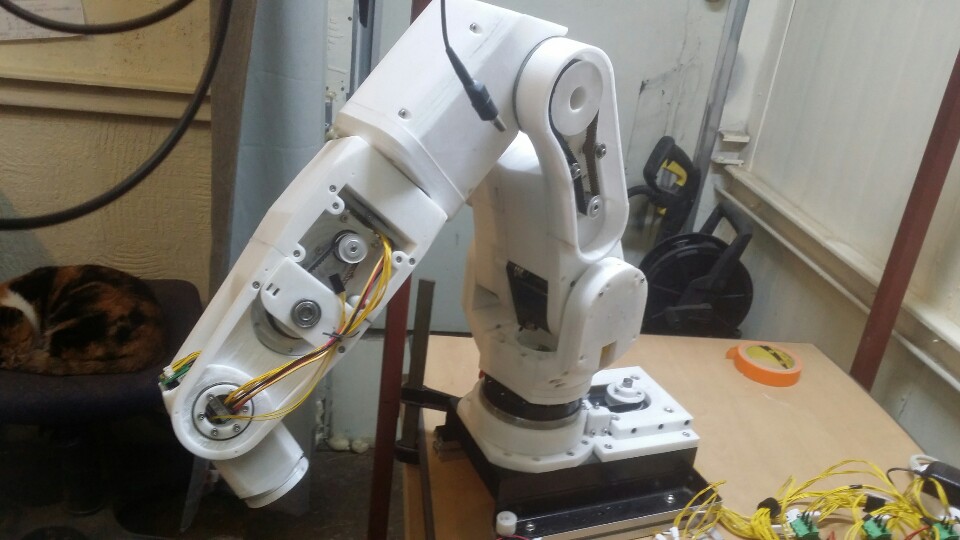
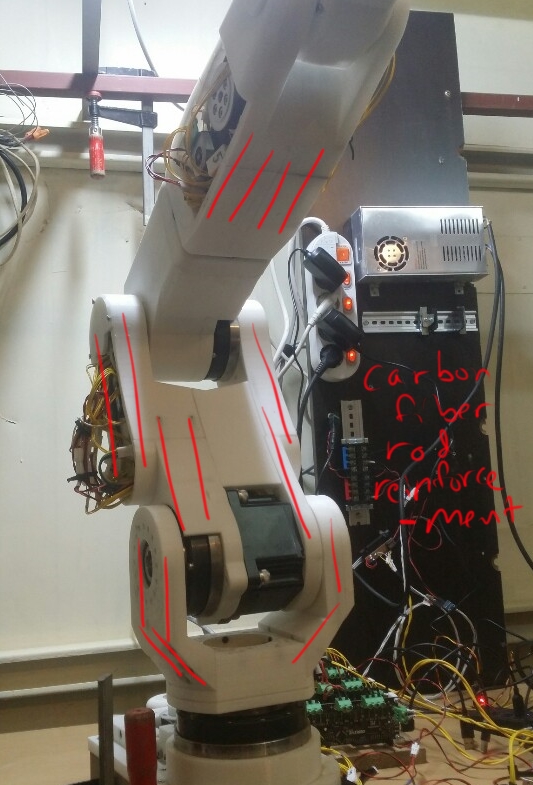
To stiffen and provide support for glueing 3D printed parts, I made cavities for carbon fiber rods and
inserted them after applying superglue. Seems to work well for joining large prints. But it still needs to be stiffer. I am considering either sand casting+machining or carbon fiber/epoxy combined with 3D printed parts

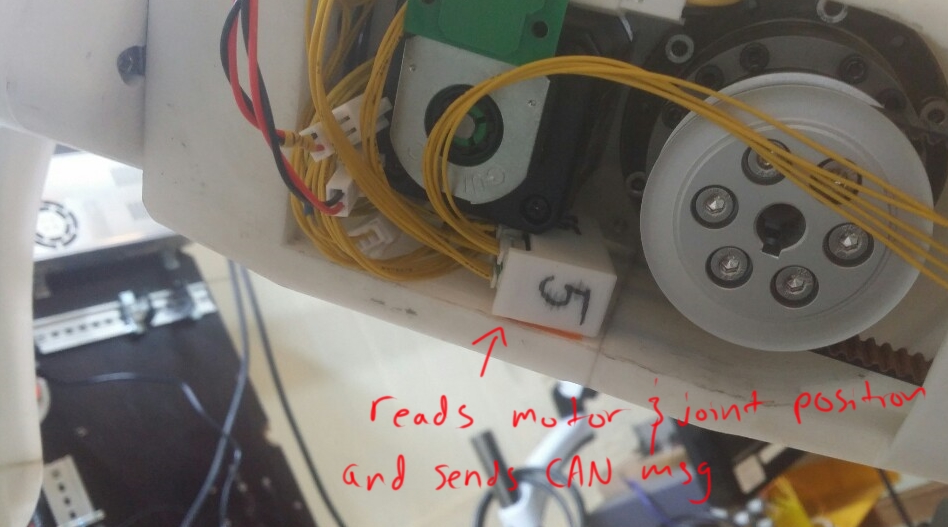
Each joint has a tiny stm32f103 board that reads motor rotor position (AMT203) and joint absolute position (magnetic encoder) and sends it off to a CAN bus. These angles are then read and ‘encoder.config.offset’ are calculated and written manually(based on offset saved after motor calibration). I do this so that joints don’t have to move at all on startup and also because without shielding the encoder cables, Z signal quality was horrible. I don’t quite understand but its much worse compared to A/B. I am in the process of adding differential drivers to them.
I had trouble losing USB connection after running for a bit, but now with release of CAN feature, I have no issues communicating with ODrive.

After working on this project I now understand why so many people are interested in integrated single axis ODrive concept. There are just too many wires to route and too many tiny terminals to crimp! I want to workon single axis concept soon and hope I can collaborate with other community members.


4 Likes

Amazing looking project!

I’m interested in getting absolute encoder feedback up and running to avoid joint movement on startup for a project I’m working on. Can you clarify how you’re doing this?

It sounds like you don’t have your encoder hooked up directly to your odrive-board but instead are sending the Encoder Count constantly via the CAN bus - is that correct? How do configure the odrive to handle that?

Also what Harmonic Drives are you using!? I’d love to check out a cheap one for that excellent backlash performance.

Oh man, how did I miss this project before? That arm looks awesome! Do you have any video?

Great to hear that CAN is working well for you!

Hi Lewis, so in order to use absolute position on startup:

  1. do a full calibration sequence then save it.
  2. turn the motor by hand until encoder count is at zero. (encoder.phase should be almost zero as well, but I recall this wasn’t always the case not so sure why).
  3. now read the absolute encoder’s position and write it down somewhere. lets call this ‘zero_angle’.
  4. assuming motor has been rotated randomly and ODrive has just been reset, read the absolute encoder position. lets call this ‘current_angle’.
offset_angle = zero_angle - current_angle
if offset_angle < 0; offset_angle += encoder_cpr  // not strictly necessary
  1. write this offset: odrv0.axis0.encoder.config.offset = offset_angle
    set is_ready prop: odrv0.axis0.encoder.is_ready = True
    (is_ready might be readonly in older firmware, if so make it regular property)
  2. now you are ready to enter closed loop control. (I am doing step 5 using a custom CAN command added to the firmware)

And I don’t have the encoder directly connected to ODrive, tho it is possible (I just didn’t want to have more wires to route).
There is a working version using ODrive’s SPI and AMT203 in Wetmelon’s feature/amt20 branch (older commit somewhere around march of 2018 if I recall correctly). I’m guessing the contributors are working on some generic implementation that will work with many absolute encoders.

The harmonic drives I’m using are:
Joint1: SHG-25-50-2UH
Joint2: SHG-20-50-2UH
Joint3: SHG-17-50-2UH
Joint4: SHG-17-50-2UH
Joint5: CSF-14-50-2UH
Joint6: (planetary)
The SHG series are hollow shaft and has much higher backdriving torque than the CSF series. Seems like sizes 17 and 20 are very common in both SHG and CSF series than sizes 14 and 25. I bought all of these +more harmonic drives from this guy(ebay seller). I am of course looking for cheaper, open source alternatives too, but 3D printed split-ring compound planetary gears were just too noisy and my printer can’t print rotating parts that well.
Glad to meet someone working on a similar project!

@Wetmelon Thank you for all the features to make the projects possible! your feature/* branches are a treasure trove! Happened three times already turns out stuff that I want in ODrive next is already there in your fork :grinning: The endstop branch is next thing I’m incorporating. I just got to work on the gripper so I’ll post a pick n place video soon.

Hey naktamello,

Thanks for the guide!

My project is similar to yours in that absolute positioning of joints is a must and that several of the joints have finite range and so I’m a bit constrained on how uncontrolled the startup sequence can be. My joints must all be very backdrivable, however, so the gearing, if any, will be very minimal - so harmonic drives are out of the question for the moment, though, I am interested in them for future projects - thanks for the links!

I took a look at wetmelon’s AMT203 branch - it could be just what I need.

Amateur question: how do I go about implementing his AMT203 SPI support features into the latest main release of the odrivetool/firmware? ie how do I add/merge his feature with the latest branch in such a way that the rest of the code stays at the latest rev?

I’ll look into it on my own - but if you know how to do that I’d really appreciate a tip!

Do you have a repo for your project or are you keeping it private?

Thanks again for your engagement!

@Wetmelon
Here is a video of the arm. Might be a few days until I get to work on it again so I’ll just post it as is. It is using trap_traj(prevents arthritis in robots!) for movement and CAN for communication.

@Lewis_Siempelkamp
I see. I’m guessing maybe sort of walking robot? I’m interested in reading about it so post about it when you get a chance! as with AMT203 branch,
i think the follow commit is the working version:

784d7177eaf1a2a041a15403f522bf39845542e4

The encoder class has another property ‘amt203_config’ and you should set

odrv0.axis0.encoder.config.encoder_type = ENCODER_TYPE_ABSOLUTE_AMT203
odrv0.axis0.encoder.amt203_config.use_absolute = True

the changes are mainly in main.cpp (odrive_main), encoder.cpp (Encoder::setup()), and amt203.cpp/hpp. I think if you have the above configs set when ODrive boots up, Encoder::setup() reads the absolute angle and sets the offset. Its been a while for me so this is all I can say about it. Shouldn’t be too hard to get it working.

As for merging I’m not sure what the proper way is in this case. In VSCode you can install an extension called ‘Git History Diff’ so you can place the latest version and this commit side by side and manually copy stuff over.

the project is a personal hobby so there is no need to keep it private but it needs some organizing before it can be useful to anyone.

hope this helps,

1 Like

So nice. I have always been fascinated with 5-6dof arms.
I made this one a while back using SHG and CSF HD.

Once you use HD for joins you never wanna use any other type of reducers!

Here is a vid

2 Likes

How did I miss this project? Looks awesome!

I also made a 6dof robotic arm for my thesis with ODrives and ROS as the simulation software. I didn’t use harmonic drives, but dual planetary gear sets based on a design I found online. Now I am documenting everything to publish it soon on this community and other communities.

Here is a picture:

2 Likes

@Jamil84 lookin real smooth!

I fiddled around with 3d printed reducers for a long time until I found out used HDs were available. I might try chinese clones (~300$) from alibaba for next arm. I also noticed HD rips the 3D printed parts right through when you crash the robot!

@LowiekVDS, so nice to meet someone using ROS with ODrive robot arm! I look forward to reading about your project, and congrats on having done a thesis on a such exciting project. In fact I am considering the planetary gear with frameless motor for my next arm. I hope to get some ideas from your design.


I am also working on ros_control plugin for ODrive(odrive_ros_control) and will be posting here after more testing.

thanks for stopping by and sharing your projects!

3 Likes

I tried many times to learn ros and moveit, but it is complex and the videos i find never helped me get started.
Do you have resources to get a beginner started with ros and move it? Maybe also how to get ROS to talk to Odrive or other microcontrollers?

1 Like

Ros is quite a pain to work with if you don’t know C programming, which is why it’s hardly used outside of maybe academia.

I found the moveit tutorials to be adequate enough to get everything to work, what problems are you having?

And the package to connect to arduino is rosserial, it should have some tutorials for arduino, as far a connecting to odrive, your best bet is to build a bridge from arduino that can talk to both of them. Or use ros industrials network communication if thats more usable.

@Roiki1
following youtube tutorials on moveit, i notice that my system is missing lots of prerequisites. Sometimes i will be compiling a code to run it and i get a bunch of errors. So i am definitely missing ROS basics info.

I wonder of i can get ROS to talk to my python script that i wrote to control the ODrive?

@Jamil84, sorry my reply is so late.
The easiest way to use trajectory generated by moveit to control ODrive is by subscribing to ExecuteTrajectoryActionGoal which you can import from control_msgs.msg. Here is an example:

class ControllerServer:
    def __init__(self):
        self.publisher = rospy.Publisher('/arm_controller/joint_states', JointState, queue_size=10)
        self.subscriber = rospy.Subscriber('/execute_trajectory/goal', ExecuteTrajectoryActionGoal, self.push_to_queue)
        rospy.init_node('controller_server')
        self.rate = rospy.Rate(10)
        self.server = actionlib.SimpleActionServer('/arm_controller/follow_joint_trajectory',
                                                   FollowJointTrajectoryAction,
                                                   execute_cb=self.execute_trajectory_goal_cb, auto_start=False)
        self.buffer = deque(maxlen=10)
        self.server.start()
        self.joint_state = JointState()
        setattr(self.joint_state, 'name', ['joint_1', 'joint_2', 'joint_3', 'joint_4', 'joint_5', 'joint_6'])
        setattr(self.joint_state, 'position', [0.0, 0.0, 0.0, 0.0, 0.0, 0,0])

    def execute_trajectory_goal_cb(self, data):
        goal = data  # type: FollowJointTrajectoryGoal
        self.server.set_succeeded()
        # print(goal)

    def run(self):
        while not rospy.is_shutdown():
            self.process_feedback()
            self.process_command()

    def process_feedback(self):
        h = Header()
        line = get_line()
        if line is not None:
            fb = JointFeedback(line)
            if fb.valid:
                h.stamp = rospy.Time.now()
                self.joint_state.header = h
                self.joint_state.position = fb.position
                self.joint_state.velocity = fb.velocity
                self.publish()

    def publish(self):
        self.publisher.publish(self.joint_state)

    def process_command(self):
        if self.buffer:
            # send_command(positions)
            self.hit_trajectory_point()

    def hit_trajectory_point(self, timeout=2):
        raw, positions, duration = self.buffer.popleft()
        send_command(positions)
        threshold = 5*0.0174533
        time_limit = rospy.get_time() + timeout
        while any([abs(error) > threshold for error in self.get_current_error(raw)]):
            if rospy.get_time() > time_limit:
                print "timed out:{}".format(str(self.get_current_error(raw)))
                return
            else:
                self.process_feedback()
                # rospy.sleep(0.01)
        print "hit target trajectory:{}".format(str(positions))

    def get_current_error(self, set_point):
        try:
            return map(sub, set_point, self.joint_state.position)
        except TypeError:
            print('breakpoint')

    def push_to_queue(self, data):
        # print(data)
        trajectory = data.goal.trajectory.joint_trajectory  # type: JointTrajectory
        points = trajectory.points  # type: List[JointTrajectoryPoint]
        prev_time = 0
        for point in points:
            positions = [inverse_map_position(p) for p in point.positions]
            time_from_start = point.time_from_start.nsecs / 10e9 - prev_time
            prev_time = time_from_start
            self.buffer.append((point.positions, positions, time_from_start))

whenever a trajectory is published by moveit, self.push_to_queue would be called and the trajectory can be processed in each ROS loop. In this example, send_command function called inside hit_trajectory_point would be where you place code to control ODrive or send UART message to some other MCU. If your script needs python3, you can create a socket to simply relay the positions+time_from_start to the python3 script controlling ODrive.

If you can share a repo of your catkin packages, I will try to help with ROS errors and getting to work with ODrive.

hope this helps,

1 Like

@naktamello
Thank you so much for this info.
I will attempt to learn and implement this and see where it goes.
I will ask you for further info when the time comes.
Really appreciate it!

I loved this project. I am trying to make a 6 axis industrial robot arm right now, I am a university student, I have a few questions for you, you would be very helpful if you answer them.

Can I write code inside the odrive controller? (such as encoding the arduino)
Can I control my odrive with the stm32f4 microcontroller?
I know my questions are very basic, I just started the project.

Awesome. I’ve like to build something like this. Did you ever document it online anywhere?